


Web Site by cg-photohraphy.co.uk


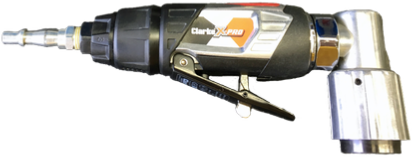
This may seem a strange one. its not a workshop project as such, but it will highlight the use of the my Machine Mart Clarke’s ‘Right Angle Air Orbital Sander’. This one is a gem, I ‘attacked’ the first headlight on my partner’s Toyota with my ‘Right Angled Air Die Grinder’ and got some good results. I just found it was a little bit too quick to use on polycarbonate lens. However, the Air DA was just about right. Reminds me of The Three Bears!
Car Headlights
I have kind of taken for granted that you already have a air compressor, it really is a must have I think.
First of all you need to use ‘wet & dry’ paper with lots of water, so what do we need? But first we need something to attach it to.
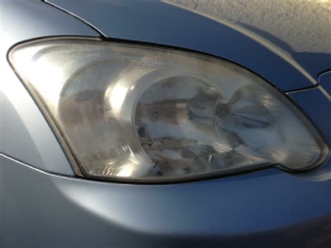
Before and….
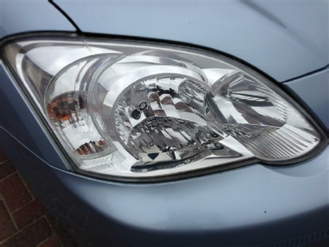
After!
Now I already stated that the ‘Right Angle Die Grinder’, runs at a speed between 8000 and 25000, and has 4 speed settings.
But the Air DA only runs also with 4 speed settings 6500 - 9500 - 12500 - and 15000rpm. This means a slower speed but more torque. So let’s have a look at what we can use with this air tool.
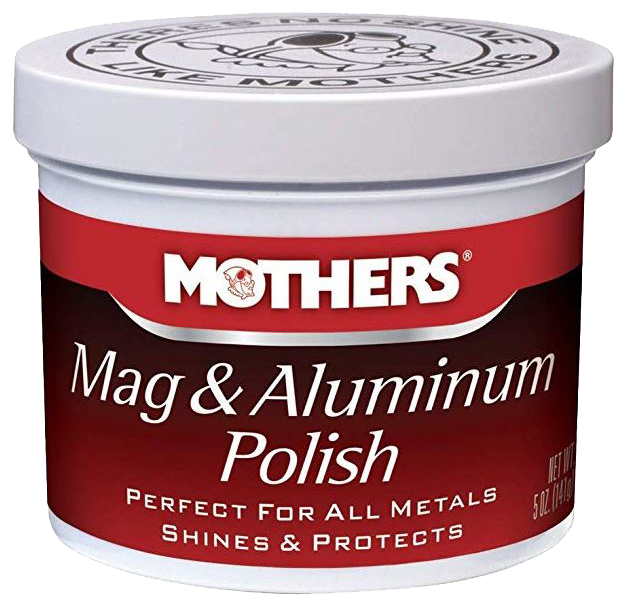
All we have to do is place some Mothers onto the orange sponge pad and polish away, keeping the pad moist with the polish, and the job is done!
Below is one of the headlights with before and an after.
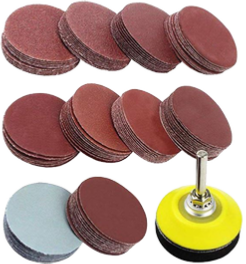
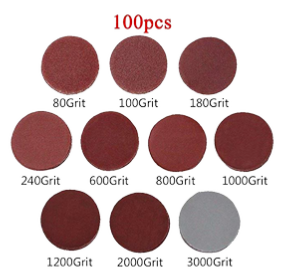
You will find that the polycarbonate surface will need to be heavily cut back. This will only be necessary if the headlight is so bad that it might fail the MOT. You will need to make a judgement call about which grit to start with. I used 800 and worked my way up to 3000grit. In fact I have just found this kit on Amazon, which includes all the sanding parts that you need. In fact even though I have all of the sanding discs myself I have just ordered this perfect set on Amazon 800 to 3000 grit inc the backing pad. See kit below:
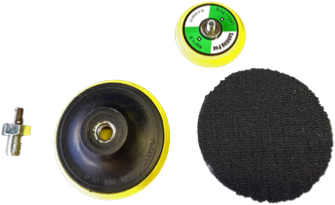
Hook n Loop Velcro backing pads are what you need to start with 2” or 50mm. Ebay or Amazon your choice. 50mm and 75mm shown.
You will notice one thing on the far left. I had to make an adapter up to be able to screw the backing pads to the Air DA. As most come with a shaft which you can unscrew. The screw thread in the pad was 10mm the thread in the DA was 5mm. I am sure that someone somewhere makes one, but I needed it now so I made one!
The technique is to start with the 800 grit and move steadily up through the grits. Very important you will need plenty of water, I used a squeegee bottle, from a kitchen spray. Keep spraying the water as you move up the 800, finishing with the 3000grit.
When you have finished, give the polycarbonate lens a good dry off with a clean microfibre cloth.
Now we need to do the polishing, and time to buy some more bits. Don’t you just love this?
We now need to move to the 75mm Hook n Loop Velcro backing pads and buy some orange sponge pads. You can get these in various levels from fine to course. I found that the orange one gave the best results.
Well this is where I let you into another secret, Mothers!
Now I found out about this a little while ago, on YouTube, and it works.
It is meant to be for Magnesium and Aluminium, as it is a metal polish, but has many uses, one of them being polycarbonate.
just right for our headlights in fact.
Now I know what you are thinking..hang on a minute what about those drill kits I have seen. You know the ones with all of the bits included? About £14. Well yes you could go down that route. However, the sanding discs are 75mm which I think is too large to get into all of the corners, this kit will also only do two headlights.
This website is about My New Workshop, my view is if you are going to buy the tools, and invest a little more, the tools can then be used to do other things, so I would also purchase all I need. With the tools I now have I can do as many headlights as I want. I have, this last Summer, now done one of the headlights on my Vauxhall Insignia. I will do the other one this year 2019 when the sun starts shining that is.
The headlights on my car are about £350 each, which make my investment very much worth while, or if you purchase all of the necessary kit, how about doing others peoples cars, for a price of course.
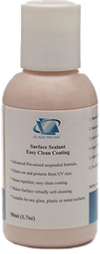
The very last thing to do is apply a coat of sealant to the polycarbonate.
Again Amazon is your friend.

Project Date: 20 July 2017
| Rage 3 Saw |
| ESAB Welder |
| Cros-Arc Plasma |
| HHO |
| Spot Welding |
| Betty's Gates |
| Car Headlights |
| Julia's Dartboard |
| Outside Light Base |
| Weather Vane |
| Geoff's Gates |
| Loft Hoist |
| Colin Laser Mount |